Configuring Network between Host and Guest VM in VirtualBox
From time to time, I experiment with different tools. In order to have the same environment and to keep my working machine clean from the garbage left after such experiments, I do my investigations in a virtualized environment. Usually, my guest operating system (OS) is Ubuntu Server because I usually use this OS in the cloud. Thus, to completely resemble my experience in the cloud I should have terminal access to the guest operating system. Unfortunately, by default after you have installed a guest virtual machine (VM) you do not have network access to it. Therefore, in this article I will show how to configure VirtualBox and guest OSes so that you get access to your virtual machines from the host, e.g., through terminal.
Table of Contents
Introduction
So as from time to time my experiments completely broke the system, I should have the possibility to deploy a clean testbed quickly. In order to reach this goal, once a new version of the operating system appears (I prefer to use LTS versions of Ubuntu Server), I download its image and create a new virtual machine where I install the operating system from the downloaded image and make initial configuration. Then, I keep this virtual machine as a template. When I need a new VM for my experiments, I clone this template VM, and I can almost instantly start my investigations. Once I have done with my experiments, I delete this cloned VM in order to free disk space.
As I do this initial configuration rarely, each time I have to search for instructions in the Internet how to configure network interfaces. So I decided to write this post as a reminder for future myself on how to configure network for my testbed.
Problem
By default, VirtualBox creates a NAT network interface for your new virtual machine to enable your guest VM to have access to the Internet. However, in this case you cannot get network access to your virtual machine from your host machine. For instance, you cannot ping it, access it through SSH, or if you develop a client-server application your client running on the host cannot server-side app running in the guest virtual machine. In order to have this possibility, you need to configure network between your Host and Guest VM. So in this article, I explain how to do this in my case.
I have to mention that configuration may differ if you have other host and guest environments. I use Kubuntu 18.04 as my host operating system and VirtualBox as a hypervisor. Here, I show how to configure Ubuntu Server 16.04 and Ubuntu Server 18.04 (two most popular LTS versions of Ubuntu Server now), so as the process is different for them.
VirtualBox Configuration
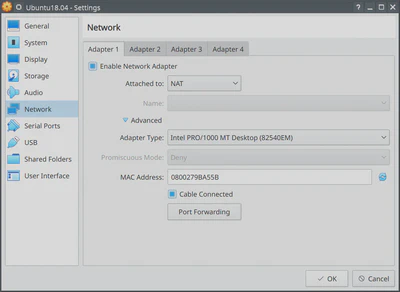
After you have installed Ubuntu Server, shut down your virtual machine, open its “Settings” (select from the menu Machine -> Settings, or press Ctrl+S), and check “Network” configuration. By default, VirtualBox activates one adapter that is attached to NAT. You can see this in Figure 1.
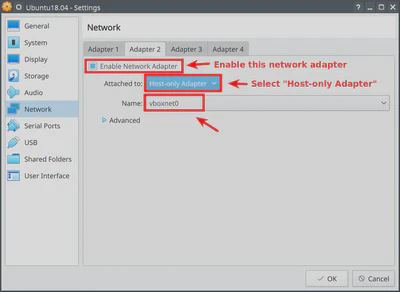
Go to the “Adapter 2” tab and enable this adaptor as well. In the “Attached to” dropdown, select “Host-only Adapter” (see Figure 2).
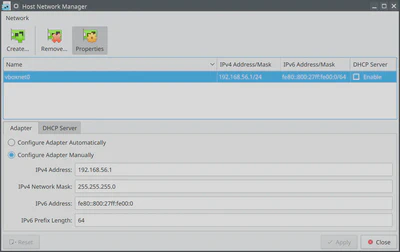
By default, VirtualBox has only one host network called “vboxnet0”. Therefore, its name will be selected automatically. If you for some reason have an empty list in the “Name” dropdown, go to File -> Host Network Manager… and create new Host-only Adaptor (see Figure 3). You can also check the properties of the “vboxnet0” adaptor there. Note the “IPv4 Address” and “IPv4 Network Mask” values. We will need them when we configure guest VMs.
If you want to read more how to configure different networking modes, please refer to the official VirtualBox documentation.
Guest VM Configuration
Now, turn on your virtual machine and log in into it. Now, you need to configure network interfaces in your guest VM.
If you plan to have several clones of machines running simultaneously, make sure that all of them would have different IP addresses, hostnames, and all their adapters have different MAC addresses.
You can set hostname running the command in the guest machine:
$ sudo hostname newname
Moreover, make sure that all MAC addresses are different in the “Advanced” settings of Network adapters (see Figure 1). If they are the same, generate new random MAC address.
Further, I will show how to configure network in Ubuntu 16.04 and 18.04, in particular, how to set (or change if you run several VMs) static IP address.
Ubuntu 16.04
First of all, you need to check what network interfaces are available using the following command:
$ ifconfig -a
Most probably, you would spot three network interfaces. In my case, these are lo, enp0s3 and enp0s8. lo is a loopback interface, while enp0s3 and enp0s8 corresponds to the NAT and Host-only networks correspondingly. Note, depending on how you have created networks and in what order, these names may be different in your case.
Now, we need to configure these interfaces. For this, you need to change the /etc/network/interfaces file. Open the file with the elevated privileges in your favorite text editor (I use nano here):
$ sudo nano /etc/network/interfaces
And modify this in the following way:
# This file describes the network interfaces available on your system
# and how to activate them. For more information, see interfaces(5).

source /etc/network/interfaces.d/*

# The loopback network interface
auto lo
iface lo inet loopback

# The primary network interface (it receives address automatically - dhcp)
auto enp0s3
iface enp0s3 inet dhcp

# Secondary interface with static ip (we need to configure this section)
auto enp0s8               # put the name of the new interface
iface enp0s8 inet static  # we choose IP address manually (static)
address 192.168.56.5      # ip address that we have chosen (each VM should have different IP in the 192.168.56.0/24 network)
netmask 255.255.255.0     # /24 network
# gateway 192.168.56.1      # if you don't have access to the Internet try to comment this option
So, for enp0s8 we choose static IP address assignment. We set it to 192.168.56.5. Note, every VM should set different IP addresses for different VMs if you want to run them simultaneously. Moreover, you can choose the IP address from the range defined for vboxnet0 (or other interface that you have chosen). The netmask value also has to correspond to the one defined for vboxnet0.
To my understanding, in order to communicate between VMs (VM1 <-> VM2) the gateway address should be also defined. It should correspond to the address of the host machine (192.168.56.1). However, in my case if this option is set, I am not able to connect to the Internet, while communication between different VMs is possible.
After the settings are modified you have to restart networking:
$ sudo systemctl restart networking
Now, you should be able to ping your host machine as well as other virtual machines in the same subnetwork using the static IP address you set on the previous step.
Ubuntu 18.04
In Ubuntu 18.04, network configuration is done using the netplan utility. This utility reads yaml configuration files store in /etc/netplan/ and generates from them network configuration consumed by the system. Therefore, in Ubuntu 18.04 instead of modifying /etc/network/interfaces, we have to create (or modify) a yaml configuration file. However, before doing this we have to check what network interfaces are available. You can do this using the following command:
$ ip a
Similarly to Ubuntu 16.04, I have the same list of network interfaces: lo - loopback interface, enp0s3 and enp0s8 refer to the NAT and Host-only networks correspondingly. Now, you should create a new file in /etc/netplan/ where we will provide our network configuration. Often, system administrators give this file the name 01-netcfg.yaml. Let’s do the same using the command sudo nano /etc/netplan/01-netcfg.yaml. Add there the following configuration:
network:
  version: 2
  ethernets:
    enp0s3:
      dhcp4: yes
    enp0s8:
      dhcp4: no
      addresses: [192.168.56.10/24]
      # gateway4: 192.168.56.1
I should note that in general you should also specify renderer: NetworkManager or networkd. In Ubuntu Server 18.04, in the default configuration the renderer is not specified (most probably, because networkd is the default option). However, if you use desktop Ubuntu version you have to add the settingrenderer: NetworkManager to your configuration on the same level where you define version and ethernets.
The settings are similar to the previous case. For enp0s3 interface, we enable dynamic allocation of IP addressing using the option dhcp4: yes, while for enp0s8 we have to configure values manually. In order to do this, we disable DHCP (dhcp4: no), set the IP address and the network mask (addresses: [192.168.56.10/24]), and possibly provide gateway IP address (gateway4: 192.168.56.1).
When you are done editing the file, you have to run the command sudo netplan try in order to check that your configuration is correct. If it is, netplan will offer to apply the configuration. If you want to apply configuration without the check, you can run command sudo netplan apply directly. However, I do not recommend doing this because with yaml files it is very easy to forget somewhere a space, and in this case your configuration file will not be valid. Checking the configuration before applying it will prevent you from shooting into your leg.