Tmux Manual
Until recently, I used tmux occasionally, only if I had to run some experiments on a remote server and later see the results of the execution. Basically, I used it only as a mean to execute commands in the background. If I needed to run several commands on a remote server parallelly, I used to open several terminals, connect each of them to the remote host and then switch between them.
Recently, I started working with a remote server through ssh more often and the routine, I used to, became very operation consuming. So, to improve my effectiveness, I spend several hours reading articles, watching videos and trainings how to use tmux. This article combines the knowledge I have acquired. It is also a crib for me if I forget something in the future.
Table of Contents
Introduction
I am not a professional user of tmux, so in this article I provide only the basics in order to start using this tool in your everyday work. Moreover, I will describe and explain only some basic tmux settings, so that you can easily configure tmux on a remote machine without copying/writing complicated config files.
Usually, tmux is not installed by default, therefore we need to install it at first. In Ubuntu-based distributives, you can install this utility firing the following command:
$ sudo apt install tmux
In order to start tmux, invoke the binary:
$ tmux
If you run this command in your terminal you will notice almost no change: only a green line (by default) in the bottom part of the window with some information will appear.
Tmux Concepts
In order to understand how to use tmux, we need to learn what components this tool consists of and what concepts it operates on. Figure 1 presents the main concepts related to this tool.
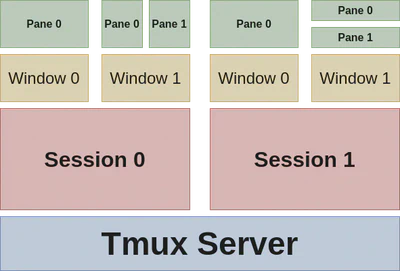
Tmux is a client-server application. When we execute tmux command, we start a client part that interacts with the server through a socket connection. This command creates a new session with one window and one pane on the server, and attach a client application to it. A user can create later several sessions, windows and panes. Note that multiple clients can be attached to the same server and session.
Let’s consider how tmux components look like on an example. Figure 2 shows a tmux client window of my current session.

A pane is a visually separate part where you execute terminal commands and see their output. For instance, on Figure 2 there are three panes (marked with large red circles with numbers): the first pane I use to run atomic commands (e.g., open VSCode to edit a post, commit changes to a git repository or push the modification remotely); the second pane is used to run hugo server that builds and serves my static website during the development; the third pane shows the current load in my system (it runs the htop command). Splitting one screen into multiple panes is very helpful, because this allows me to see the output of multiple commands at the same time without switching between different terminal instances. A pane can be imagined as a separate application window. You can have several programs’ windows placed aside to each other in order to see their results at the same time.
A set of panes on one screen constitutes a window. You can have several tmux windows and switch between them, each of which would have its own layout of panes. Tmux windows are similar to virtual desktops: only one desktop is shown at a time; however applications on other, even not visible desktops, are executed at the same time. On Figure 2, there are two windows: their labels in the status bar (see bottom left part of the figure) are highlighted with pink rectangles, number 4 (1:bash-) and number 5 (0:hugo*). By default, tmux assigns labels to the windows automatically using the name of the program that runs in the currently active pane of the window. For instance, in the window 0:hugo* pane 2 is currently active that is used to run hugo server, therefore the label of the window includes this program’s name. The number before the column corresponds to the window index. Window indices are used as a “part of address” that enables one to send commands to the right window.
You could also spot some auxiliary characters after the window labels, e.g., * after 0:hugo and - after 1:bash. These symbols provide additional information about the window. For instance, * means that the window with this symbol is currently active. Tmux manual provides the following meanings of these characters:
*denotes the current window;-marks the last window (previously selected);#means that the window is monitored and activity has been detected;!means that a bell has occurred in the window;+designates that the window is monitored for content and it has appeared;~shows that the window has been silent for the monitor-silence interval.
Tmux windows are run within a session on the server. A session can be considered as a set of windows united by one goal. It resembles a user session if we continue considering the analogue with operating system interface elements. There can be several users working with different applications on one machine; similarly, several tmux sessions can be run simultaneously with their own set of windows and panes.
Some developers prefer to consider a session as a separate project that unites several windows where one performs different tasks related to the same project. For instance, first window may unite front-end development tasks (one pane to modify the code, second pane to install necessary front-end dependencies), the second window may bind together backend development tasks (one pane to start a server using docker, while the second pane can be used to watch the logs). Both these windows are related to one project. If a developer works simultaneously with several projects, s/he can use sessions to switch between them easily: just by attaching to the corresponding tmux session.
For instance, on Figure 2 you can see that my session is called website (the session label is highlighted with a blue rectangle and circle with number 6) because it is related to my website development project. If I need to write a new blog post or modify something on my webpage, I run tmux and activate this session.
Each session is persistent and will survive accidental disconnection, e.g., if an ssh connection to a remote server is dropped. Later, you can reattach to this session using a special command and continue from the point where you have been interrupted. A user can kill a session, if it is not required anymore. After a user closes the last pane of the last window in a tmux session, the session also finishes automatically.
Unfortunately, if you restart a tmux server (e.g., if you develop locally and reboot your machine, or if you develop remotely and reboot your remote host) tmux sessions will not survive. Therefore, you would need to create your sessions and layouts from scratch again in such case. Luckily, you can automate these tasks by interacting with tmux through its commands, which we consider in the following section.
Tmux Commands
As we have mentioned before, tmux is a client-server application. Server is responsible for multiplexing the terminals and representing them as sessions, windows and panes. The client is used to interact with these server abstractions of separate terminals.
You can use tmux to send commands to tmux server. In order to do this, you need to execute the tmux <command> <parameters> command in a terminal. If you are already inside a tmux session, you can also press prefix : — the tmux status bar will show the : (column) invitation, and there you can enter a tmux command with parameters.
In order to interact with a particular terminal in tmux server, you need to know its address (or target). Usually, it has the following format: <session_name>:<window_index>.<pane_index> (however, the format may be changed). Using the address, it is possible to send commands to a particular terminal.
Tmux commands are often used in bash scripts to prepare a working environment. For instance, the following bash script can be used prepare the environment similar to the one shown on Figure 2:
#!/bin/bash

# check if the session called exactly 'website' exist
if ! tmux has-session -t=website; then
  # if it does not exist
  # create a new session (new -s) called 'website' detached (-d flag)
  tmux new -s website -d

  # split the 0th pane of the 0th window of the 'website' vertically
  tmux split-window -v -t website:0.0
  # split the 1st pane of the 0th window of the 'website' horizontally
  tmux split-window -h -t website:0.1

  # send-keys (change directory command) in the 0th window and 0th pane
  tmux send-keys -t website:0.0 'cd "/home/yury/PROJECTS/PERSONAL/zyrikby_webpage/website/"' Enter
  # run vscode editor in the content/ directory in the target pane website:0.0
  tmux send-keys -t website:0.0 'code .' Enter
  # send-keys (change directory command) in the 1st pane of the 0th window
  tmux send-keys -t website:0.1 'cd "/home/yury/PROJECTS/PERSONAL/zyrikby_webpage/website/"' Enter
  # run hugo server there
  tmux send-keys -t website:0.1 'hugo serve -e production -D -F' Enter
  # run htop command inside the 2nd pane
  tmux send-keys -t website:0.2 'htop' Enter
fi

# attach to the session called 'website'
tmux a -t=website
In this script, we check if a session called website (exact match) exists. If it does not, we create a new detached one. Then, in this session we split our window into three panes and run the commands there. In the end of the script, we attach to the session named website (newly created or existing one).
Note if you change the value of the base-index and pane-base-index parameters in the configuration, you would need to modify the script, because the indices of the window and panes would be changed accordingly.
If you want to develop a script that does not depend on window and pane indices, then you need to create named windows and interact with panes using their relative positions. However, this may considerably complicate the script.
Such scripts are very useful if you repeat the same set of actions regularly. They allow you to create a working environment using only one command even after your computer is rebooted.
Note that you can run several clients simultaneously to interact with the same session. This functionality can be used, e.g., to allow several users to attach to the same session and work simultaneously. For instance, this can facilitate teaching new developers how to do something on a server instead of using screen sharing.
Tmux Hotkeys
Although tmux commands are very useful, true tmux power concludes in the extensive usage of hotkeys when you are inside a tmux session.
When you run something in tmux, by default all keypress events are sent to the terminal of the currently active pane. Therefore, it is obvious that in order to interact with tmux server itself, we need to prepend them with a special “escape” sequence. This sequence is called prefix. This key chord tells that the following keypresses should be interpreted by tmux server. By default, the prefix correspond to Ctrl+b. However, so as it is not very convenient to press these two keys together, some developers rebind them, e.g., to Ctrl+a or to Ctrl+s.
Note that tmux uses special characters to designate some control keys:
CforCtrl;MforAlt(Meta);SforShift.
This control keys go in the beginning of a key sequence, so you should not confuse them with the capital c, m and s keys.
In what follows, we will use these shortcuts. For instance, instead of writing Ctrl+b, we will further use C-b.
C-d and C-D are two different hotkeys (in the latter case, you also need to press Shift key together with d).Tmux Actions
Now, we are ready to consider what you can do using tmux. In this section, we will consider the most common actions that you can perform with the help of tmux. how to perform the most common actions in tmux that I face in my work. For the complete list of all possible actions, you can refer to a tmux online man page or run man tmux to read the manual in your terminal.
In case of most common actions, usually we can achieve the same goal using both tmux hotkeys and tmux commands. However, the correspondence between tmux commands and hotkeys is not one-to-one. Tmux is very flexible in configuration: you can bind a tmux command, a sequence of tmux commands, or even shell commands to a particular key. Below, we consider the default key bindings and most often used tmux commands (in parenthesis, we give an alias for a command).
tmux attach, you can shorten the command to tmux at or even tmux a because there is no other tmux command starting with a.| Tmux Command | Tmux Shortcut | Explanation |
|---|---|---|
| General Actions | ||
| detach-client (detach) | prefix d | Detach the current client |
| detach-client (detach) -t <client_name> | prefix D | Choose a client to detach |
| command-prompt | prefix : | Enter the tmux command prompt |
| list-keys (lsk) | prefix ? | List all key bindings |
| bind-key (bind) <key> <command> | Bind key to a command | |
| unbind-key (unbind) <key> | Unbind the command bound to the key | |
| list-commands (lscm) | List all tmux commands | |
| show-options (show) | Show tmux options | |
| source-file (source) <path> | Execute commands from a file | |
| Session Actions | ||
| attach-session (attach) -t <session_name> | Attach to a session | |
| new -s <session_name> | Create new session with the name | |
| list-sessions (ls) | List sessions | |
| rename-session (rename) | prefix $ | Rename the current session |
| switch-client (switchc) -t <session_name> | prefix s | Select a new session for the attached client interactively |
| kill-session -t <session_name> | Kill session | |
| Window Actions | ||
| new-window | prefix c | Create a new window |
| select-window (selectw) -t <0 to 9> | prefix <0 to 9> | Select windows from 0 to 9 |
| select-window (selectw) -t <target_window> | prefix w | Choose the current window interactively |
| rename-window (renamew) | prefix , | Rename the current window |
| kill-window (killw) | prefix & | Kill the current window |
| select-window (selectw) -l | prefix l | Move to the previously selected window |
| select-window (selectw) -n | prefix n | Change to the next window |
| select-window (selectw) -p | prefix p | Change to the previous window |
| Pane Actions | ||
| split-pane -v | prefix " | Split the current pane vertically into two: top and bottom |
| split-pane -h | prefix % | Split the current pane horizontally into two: left and right |
| select-pane (selectp) -l OR last-pane | prefix ; | Move to the previously active pane |
| select-pane (selectp) -D/-U/-L/-R | prefix Up/Down/Left/Right | Select the pane below/above/to the left/to the right |
| resize-pane (resizep) -D/-U/-L/-R | prefix C-Up/C-Down/C-Left/C-Right | Resize the current pane in steps of one cell |
| resize-pane (resizep) -Z | prefix z | Toggle zoom state of the current pane |
| kill-pane (killp) | prefix x OR C-d | Kill the current pane |
| display-panes (displayp) | prefix q | Briefly display pane indexes |
| swap-pane (swapp) -U | prefix { | Swap the current pane with the previous pane |
| swap-pane (swapp) -D | prefix } | Swap the current pane with the next pane |
| break-pane (breakp) | prefix ! | Break the current pane out of the window |
Copy Mode
Unfortunately, when you work with a terminal in tmux, it does not always behave as you expect. For instance, if you would try to scroll up to see the output, you would not be able doing this. This is because tmux window may be in one of two modes. The default permits direct access to the terminal attached to the window (this mode and its actions we considered in the previous section). The other is copy-mode, which permits a section of a window or its history to be viewed or copied so that it can be inserted later in another window.
In the table below, I provide the set of keys used in copy-mode:
| Tmux Command | Tmux Shortcut | Explanation |
|---|---|---|
| Copy-Mode Related Actions | ||
| copy-mode | prefix [ | Enter copy mode |
| paste-buffer (pasteb) | prefix ] | Paste the most recently copied buffer of text |
| list-buffers (lsb) | prefix # | List all paste buffers |
| choose-buffer | prefix = | Choose which buffer to paste interactively from a list |
| delete-buffer (deleteb) | prefix - | Delete the most recently copied buffer of text |
Inside the copy-mode, you can use two different key layouts to navigate: emacs or vi. In the configuration file, you need to change the mode-keys option to choose what layout to use. By default, the emacs layout it used.
| vi shortcut | emacs shortcut | Explanation |
|---|---|---|
| Space | C-Space | Begin selection |
| q | Escape | Escape |
| Enter | M-w | Copy selection and cancel |
| k | Up | Move cursor up |
| j | Down | Move cursor down |
| h | Left | Move cursor left |
| l | Right | Move cursor right |
| / | C-s | Search forward |
| ? | C-r | Search backward |
| n | n | Search next result |
| N | N | Search previous result |
| : | g | Go to line |
Configuration
It is possible that you would need to adjust some tmux settings. For the current user, tmux configuration is usually stored in the ~/.tmux.conf file. Once you have modified this file, you can load the made changes into tmux using the following command (this command will execute all the commands in the file):
$ tmux source-file ~/.tmux.conf
Tmux is a highly customizable tool. After extensive configurations it may look and behave completely different way compared to its default configuration. In the Internet, you can find many different useful configurations, e.g., check out this one. However, development of such configuration requires quite a lot of time. Moreover, if you do not have access to the Internet it would be difficult to type all these commands in an isolated environment. Therefore, in this section we will consider only the most useful configuration options.
First of all, as I have already mentioned, a lot of people do not like to use Ctrl+b as a prefix. They have two choices: either rebind prefix to a new key chord, or configure the second prefix:
# remap prefix from 'C-b' to 'C-a'
unbind-key C-b
set-option -g prefix C-a
bind-key C-a send-prefix

# bind prefix2 to 'C-s'
set-option -g prefix2 C-s
bind-key C-s send-prefix -2
In these lines, we at first unbind default prefix C-b so that we can use it later. Then, we are binding prefix to the C-a key chord globally (-g) using the set-option command. The following configuration line allows one to send C-a to the terminal if this combination is pressed twice. Similarly, we configure the prefix2 binding to C-s.
Now, let’s consider some options that improve user experience:
# set mode keys
set-option -wg mode-keys vi

# mouse behavior
set-option -wg mouse on

# increase history size
set-option -g history-limit 5000
# faster command sequences that involve 'Escape' key press
set-option -g escape-time 20
# increase repeat timeout
set-option -g repeat-time 600
The history-limit option increases the size of the history buffer size to 5000 lines; escape-time reduces the time tmux waits if ‘Escape’ key is pressed; repeat-time increases the time tmux waits for repeated key press events (the keys bound using the command bind-key with the flag -r): if you press a key within the repeat-time there is no need to prepend it again with prefix.
So as it is quite hard to press 0 to activate first window (or pane), it is recommended to start numbering windows (and panes) from 1; if you close a window, tmux should renumber windows:
# start windows numbering from 1
set-option -g base-index 1
# start pane numbering from 1
set-option -wg pane-base-index 1

# rename window automatically to reflect what program is running
set-option -wg automatic-rename on
# renumber windows when a window is closed
set-option -g renumber-windows on
Some people do not like the default keys assigned to split windows horizontally and vertically because signs % and " do not remind vertical and horizontal lines. Instead, they prefer to use more descriptive characters:
# split panes using | and -
bind-key | split-window -h
bind-key - split-window -v
unbind-key '"'
unbind-key %
Finally, with the default shortcut layouts it is not convenient to move between the panes: you need at first press the prefix and then move your hand and press arrows. Some people prefer to use vim keys (h,j,k and l) to move between panes. However, personally I prefer to use arrow keys pressed together with Alt (Meta - M) key without prepending them with tmux prefix. Similarly, to change the size of panes I use Shift+Alt+Arrow shortcut:
# switch panes using Alt-arrow without prefix
bind-key -n M-Left select-pane -L
bind-key -n M-Right select-pane -R
bind-key -n M-Up select-pane -U
bind-key -n M-Down select-pane -D

# resize panes using Shift-Alt-arrow without prefix
bind-key -n S-M-Left resize-pane -L 2
bind-key -n S-M-Right resize-pane -R 2
bind-key -n S-M-Up resize-pane -U 2
bind-key -n S-M-Down resize-pane -D 2
Conclusion
Tmux is a very powerful tool. Unfortunately, I use only a small fraction of its functionality until recently. One of the reason to abandon this tool was that it was not easy to grasp the concepts behind tmux and remember its keys. However, I could say that the time investment worth it. Hopefully, this article may help others to discover the potential of this utility.