Maintaining CV and Resume Simultaneously with LaTeX and ModernCV Template
This is the time for me to start looking for a new position. The first thing to do when you start this process, is to update your CV and resume. Although a lot of people (including myself until recently) think that these are two identical documents, in reality they are not. Resume is a short (max 3 pages) concise summary of your experience and achievements that show how you fit the future position. HR people screen tons of documents everyday, and they want to know if a person fits the position from the first glance. In CV, you describe your experience in details, mentioning all the projects that you have participated in, your contributions, what technologies have been used, etc. Moreover, if you have an academic experience, you list there all your publications and academic achievements. As a result, your CV could be quite long especially if you have huge experience, a lot of publications or both. Thus, if you have been chosen the interviewers may understand your experience in details.
Still, both these documents may share the same sections like education and working experience. In order to follow the DRY (don’t repeat yourself) principle and unify the style of my CV and resume, this time I have made them using the same LaTeX template called moderncv. In this article, I explain how I maintain these two documents together and list the modifications that I have made.
Table of Contents
Prerequisites
This is not the perfect solution to everyone. However, if you know how to use LaTeX I would recommend this approach because it allows you to create visually appealing documents of the same style. In order to start developing your CV and resume, you need to perform some prerequisite actions:
- Create a directory to store all the files related to the project:
$ mkdir ~/cv_resume - Clone the repository with the ModernCV template locally. Although ModernCV is distributed as a LaTeX package and have been recently updated in the repository after new maintainers have been added, it may happen that your LaTeX distribution still uses the old one. Therefore, I recommend to get the latest version of the template directly from the git repository. Moreover, later we will update some files from this repository. Unfortunately, if you use the “compiled” package it is not straightforward to make these modifications.
$ cd /tmp $ git clone git@github.com:moderncv/moderncv.git - Copy
moderncv.clsand all*.styfiles to your project directory:$ cp /tmp/moderncv/moderncv.cls ~/cv_resume/ $ cp /tmp/moderncv/*.sty ~/cv_resume/ - If you do not plan to modify ModernCV template, you can skip steps 2 and 3.
- In your project directory create two files:
cv.texandresume.tex, and copy there the content fromtemplate.tex:$ cp /tmp/moderncv/template.tex ~/cv_resume/cv.tex $ cp /tmp/moderncv/template.tex ~/cv_resume/resume.tex - Create a subdirectory in your project directory to store the content of the sections for our CV and resume.
$ cd ~/cv_resume/ $ mkdir sections - Now, you are ready to develop the content. Open the project directory in your favorite TeX editor. For instance, I use VSCode:
$ code ~/cv_resume
Writing Content
For every section that you plan to add to your CV or resume add a corresponding file to the sections subdirectory. For instance, my sections directory contains the following list of files, each of them correspond to a separate section either in CV/resume or both:
$ tree sections/
sections/
├── academic_advisoring.tex
├── academic_projects.tex
├── education.tex
├── experience.tex
├── honors.tex
├── important_achievements.tex
├── industrial_projects.tex
├── languages.tex
├── public_talks.tex
├── publications.tex
├── references.tex
└── skill_matrix.tex
Now, fill these files with the content using the commands provided by the ModernCV package. I will not explain in details how to develop the content using the commands provided by the package. If you know LaTeX, just open template.tex, and there you will find the examples and explanations how to use different commands. For instance, my education.tex file contains the following content:
\section{Education}

\cventry{2009/11 -- 2014/04}{Ph.D. in Computer Security}{\href{https://unitn.it}{University of Trento}}{Trento, Italy}{}{
    \emph{Thesis:} Improving the Security of the Android Ecosystem \newline{}
    \emph{Advisor:} Bruno Crispo
}

\cventry{2006/09 -- 2007/06}{M.Sc. (eq.) in Computer Security}{\href{https://bsu.by}{Belarusian State University}}{Minsk, Belarus}{}{
    \emph{Thesis:} Steganographic Data Hiding Audiosystem with Heightened Throughput Capacity \newline{}
    \emph{Advisor:} Vasiliy Sadov
}

\cventry{2002/09 -- 2006/06}{B.Sc. in Computer Security}{\href{https://bsu.by}{Belarusian State University}}{Minsk, Belarus}{}{
    \emph{Thesis:} Development of a Web Ordering System for the University Computer Classes \newline{}
    \emph{Advisor:} Natalia Novikova
}
Open your cv.tex and resume.tex files and modify the body adding as inputs paths to the corresponding section files located in the sections directory. For instance, below is the body of my cv.tex file:
\begin{document}
\makecvtitle

\input{sections/important_achievements.tex}
\input{sections/experience.tex}
\input{sections/education.tex}
\input{sections/industrial_projects.tex}
\input{sections/academic_projects.tex}
\input{sections/public_talks.tex}
\input{sections/academic_advisoring.tex}
\input{sections/honors.tex}

\input{sections/publications.tex}
\end{document}
Such file structure allows me to add, move and remove sections quite easy: you just need to modify the corresponding lines. The resume.tex file looks similarly:
\begin{document}
\makecvtitle

\vspace{-6ex}
Looking to tackle complex R\&D computer security and data analysis problems that make difference.

\input{sections/experience.tex}
\input{sections/education.tex}
\input{sections/skill_matrix.tex}
\input{sections/references.tex}

\end{document}
As you can see, the bodies of two documents are easy to modify and have just few differences. First, to the resume I have added an introductory sentence (the \vspace{-6ex} command moves this line a little bit closer to the top). Second, the list of the sections in these documents are different, however, you can still find education and experience sections in both of them. Thus, if I want to make a modification in these sections, I need to do this only in one place.
Preamble Modifications
In addition to the modifications described in the previous section, I have also modified the preambles of CV and resume a little. Let us consider them in details.
Note that you can use different themes for these documents. For instance, one document could be greeny, while other document will be blue. Personally, I use the same ModernCV theme for both documents:
\moderncvstyle{classic}                           % style options are 'casual' (default), 'classic', 'banking', 'oldstyle' and 'fancy'
\moderncvcolor{green}                             % color options 'black', 'blue' (default), 'burgundy', 'green', 'grey', 'orange', 'purple' and 'red'
Resume
First of all, so as resume is quite a short document, I decrease the size of the basic font to 11pt:
\documentclass[11pt,a4paper,sans]{moderncv}
Then, I set the font style for name and title:
\renewcommand*{\namefont}{\fontsize{24}{28}\mdseries\upshape}
\renewcommand*{\titlefont}{\fontsize{11}{14}\mdseries\slshape}
In the preamble, I also specify doctype. I have added this command to the ModernCV package. Later, I explain why I need this and how to modify the ModernCV template:
\doctype{R\'{e}sum\'{e}}
Also, you will need to modify the parameters related to your personal data. I use the same commands as in the standard template, you will need to change the values accordingly.
\name{Yury Zhauniarovich, PhD}{}
\title{R\&D Specialist with Focus on Security and Data Analysis}

\social[linkedin]{zhauniarovich}
\social[github]{zyrikby}

\photo[72pt][0.1pt]{image/yury}
CV
The modifications in CV are similar. So as CV is a quite lengthy document, I increase the font size to make it easier to read:
\documentclass[11pt,a4paper,sans]{moderncv}
Similarly, I change the font style for personal name and title. You can play with these parameters so that the elements in your CV look proportional and pretty:
\renewcommand*{\namefont}{\fontsize{24}{28}\mdseries\upshape}
\renewcommand*{\titlefont}{\fontsize{20}{24}\mdseries\slshape}
Set the doctype to CV: \doctype{CV} and modify your personal information.
ModernCV Template Modifications
When you open the document in a pdf application, the title of the window should be different — you need to see what document you have opened. For instance, if you open my CV the title of the window would be Yury Zhauniarovich, PhD - CV, while if you open my resume the window title would be Yury Zhauniarovich, PhD - Résumé. Unfortunately, I have not found a way to modify hypersetup properties in the preamble of the documents, therefore I have modified the ModernCV package file called moderncv.cls in order to achieve this behavior.
First of all, I have created a new parameter doctype. Open the moderncv.cls file and in the “overall design commands definitions” section add this new command definition:
% usage: \doctype{<CV|R\'{e}sum\'{e}>}
\newcommand*{\doctype}[1]{\def\@doctype{#1}}
Then, modify hypersetup values:
  \hypersetup{
    breaklinks,
    baseurl       = http://,
    pdfborder     = 0 0 0,
    pdfpagemode   = \pdfpagemode,
    pdfstartpage  = 1,
    pdfcreator    = {\LaTeX{} with 'moderncv' package},
%    pdfproducer   = {\LaTeX{}},% will/should be set automatically to the correct TeX engine used
    bookmarksopen = true,
    bookmarksdepth= 2,% to show sections and subsections
    pdfauthor     = {\@firstname{}~\@lastname{}},
    % pdftitle      = {\@firstname{}~\@lastname{}\notblank{\@title}{ -- \@title}{}},
    pdftitle      = {\@firstname{}~\@lastname{}\notblank{\@doctype}{ -- \@doctype}{}},
    % pdfsubject    = {R\'{e}sum\'{e} of \@firstname{}~\@lastname{}},
    pdfsubject    = {\@doctype{} of \@firstname{}~\@lastname{}},
    pdfkeywords   = {\@firstname{}~\@lastname{}, curriculum vit\ae{}, r\'{e}sum\'{e}}}}
With such modifications (and definition of the doctype in CV and resume documents’ preamles), the properties of the document will be changed accordingly.
You can download the modified version of the moderncv.cls file here. Just copy it to ~/cv_resume directory and substitute the corresponding file.
Skill Matrix Widget Modifications
In the recent versions of the ModernCV package, you can add a skill matrix widget to your application. To my point of view, this is a very informative widget, and I expect it to be widely used in job seekers’ resumes. However, I do not like its default view shown in Figure 1:
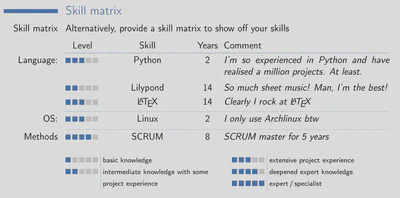
- To my point of view, the data in the “Years” column is not informative. You cannot measure your experience by the amount of years. Therefore, I think that this is an unnecessary column.
- To my opinion, the “Skill” column should follow after the category. So as I read from left to right, I expect the categorization happing in the same direction. If the second column is “Level” as in the default widget, then I expect the information to be grouped by the knowledge level, i.e., in a category at first I expect to see all the skills with the level equal to 1, then all skills with the level 2, and so on.
- So as the “Comment” column is expected to contain quite extensive description, I would like to decrease the font size in this column because the size of the resume is limited.
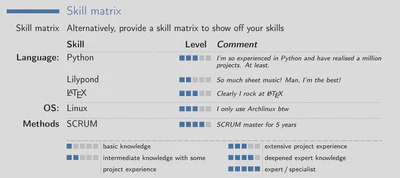
I spent some time modifying the code of the skill matrix widget addressing the aforementioned issues. In Figure 2, you can see how the skill matrix widget looks after the modifications I have made:
In the repository, you can find the file with my modifications. Note that these are quite “dirty” hacks, however, they address my needs, and therefore, I do not see the value in spending additional time improving them to be more generic.
So as I removed “Years” and rearranged other columns, the command format to add a skill is also changed. For instance, the following code adds the widget shown in Figure 2:
\section{Skill matrix}
\cvitem{Skill matrix}{Alternatively, provide a skill matrix to show off your skills}

% head of the skill matrix
\cvskillhead[-0.1em]

% format of the entry: <Category><Skill><Level><Comment>
% * means if the dotted line should be added before the line
\cvskillentry*{Language:}{Python}{3}{I'm so experienced in Python and have realised a million projects. At least.}
\cvskillentry{}{Lilypond}{2}{So much sheet music! Man, I'm the best!}
\cvskillentry{}{\LaTeX}{3}{Clearly I rock at \LaTeX}
\cvskillentry*{OS:}{Linux}{3}{I only use Archlinux btw}
\cvskillentry*[1em]{Methods}{SCRUM}{4}{SCRUM master for 5 years}

% add the legend to the matrix
\cvskilllegend*[1em]{}
In order to use the code my modified widget, just copy it to your ~/cv_resume/ directory substituting the corresponding file from the ModernCV package.
Conclusion
With all these modifications, the process of updating my CV and resume is much easier. Now, I just need to update my information from time to time in one place. Hopefully, this article will help someone to find a dream job and facilitate HRs’ lives.