Updating Thunderbird from 78 to 91 on Ubuntu
As you may know, I am a long user of an Ubuntu-flavored operating system (Kubuntu). So as I need a stable system, I usually stick with the Long Term Support (LTS) releases. Currently, my laptop runs Kubuntu 20.04.
At my new working place, people actively use calendar/email facilities. Hence, I have to start using an email client that supports this functionality. Our IT support recommends using Thunderbird, and I followed their advice. As usual in Linux distros, I have installed a Thunderbird version using my package manager and configured my email client according to the recommendations.
However, after I started to use it, I have faced issues in calendar functionality (e.g., its inability to synchronize event data) that were very difficult to triage. I checked some forums looking for explanations of some particular error codes and how to resolve them. There, I discovered that the calendar sub-system was improved considerably in Thunderbird 91.0. I checked my version of Thunderbird, and it was 78.13.x. After I found that, I decided to update Thunderbird. However, at that time, I did not manage to find a Personal Package Archive (PPA) or a deb file with this newer version. Therefore, I decided to wait until a new Ubuntu version (21.10) would be released because I thought it might bring Thunderbird 91. Unfortunately, this did not happen for older releases, and I decided to install Thunderbird 91 manually. In this article, I describe how I updated Thunderbird from version 78 to 91.
~/.thunderbird directory. Just copy this directory to a safe location.Installation
First of all, close Thunderbird if it currently runs in your system. Now, download the latest software version here by clicking on a “Free Download” big green button. The process of the .tar.bz2 archive downloading should start automatically. Alternatively, you can manually choose a Thunderbird version for your operating system and your language preferences at this webpage.
Now, prepare the directory where you install Thunderbird. I keep this kind of software (that does not have external dependencies) under the ~/soft/ directory. Change working directory to the one with the downloaded archive, and execute the following command (note the absolute path to the soft directory):
$ tar xjf thunderbird-*.tar.bz2 --directory="/home/yury/soft/"
You can also copy the archive to the soft directory and execute the command without the --directory parameter. So, now your system is ready to launch. To check that everything is working, run the following command from the soft directory:
$ cd ~/soft
$ ./thunderbird/thuderbird
If the Thunderbird application opens, then everything is working fine.
Configuring Profiles
When I ran Thunderbird the first time this way, I found out that all my configuration, emails, and calendar events had disappeared. Apparently, when you launch Thunderbird the first time, it creates a new profile despite the ones already exist. You can find out which profile Thunderbird has created if you compare the content of your ~/.thunderbird directory with the backup version that we have stored before the first launch. In my case, the new profile was called default-release1.
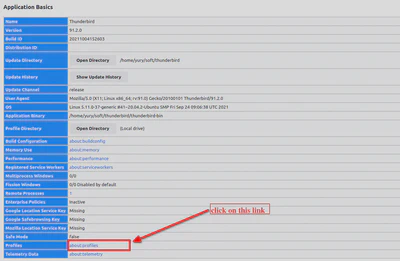
To recover all the configurations, emails, and events, we need to activate the profile stored by the previous version of Thunderbird. Go to the menu and select “Help -> More Troubleshooting Information.” A new tab should open called “Troubleshooting Information.” In the “Application Basics” table (see Figure 1), find the “Profiles” row and click on the “about:profiles” link.
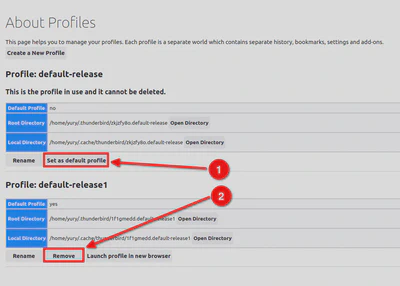
On the appeared “About Profiles” tab (see Figure 2), at first activate the “default-release” profile, and then delete the “default-release1” profile so as it is not necessary anymore.
Now, restart Thunderbird, and everything should work fine.
Kubuntu: Making Program Shortcut (Optional)
Being installed in this way, you can launch Thunderbird each time using the command described in the “Installation” section. However, this is not convenient. The better approaches are to either create a link to the thunderbird executable (e.g., a soft link to the executable or a bash script to invoke it) in one of the directories included in your “PATH” variable and/or create an application shortcut. In the first case, you would be able to launch Thunderbird from terminal applications, while in the latter case, KRunner could start the app. In this section, I describe how to configure the latter case.
To create an app shortcut, right-click on the “Application Launcher” icon in the panel and choose the “Edit Applications” option. The window of “KDE Menu Editor” should appear (see Figure 3).
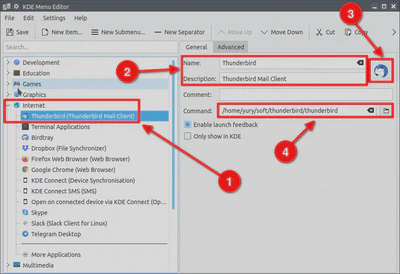
In the left part, choose the appropriate category to create a new application shortcut. I have chosen the “Internet” category. Right-click on it and choose “New Item…”. Fill the fields following Step 2 on Figure 3. Now, click on the icon button (see Step 3), and assign the icon to the application (you can find Thunderbird icons in chrome/icons/default/ subdirectory). Now, press on directory button (Step 4) and choose path to the Thunderbird executable.
After all these steps are over, you can launch Thunderbird from KRunner.
Kubuntu: Birdtray (Optional)
By default, if you run Thunderbird, it stays minimized in your panel occupying valuable space there. It also does not notify about new inbox emails. To overcome these limitations, George Yunaev has developed an application called Birdtray. To start using this application, follow the instructions to build this application for your Linux version.
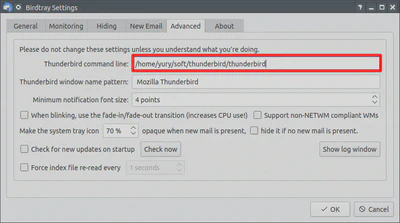
Once you have built and installed it, start the application. In your system tray, you should see the Thunderbird icon. Right-click on this icon, and choose the “Settings” item. Open the “Monitoring” tab and select the folders that you would like Birdtray to monitor. Open the “Advanced” settings tab and specify the path to the Thunderbird executable (see Figure 4).
Among other useful configuration options, check if Birdtray has to start and/or shutdown Thunderbird automatically. For other options, please explore the rest setting tabs.